
Data Export and Import Best Practices
Data Export and Import Best Practices
This document outlines the best practices, key considerations, and troubleshooting steps for exporting and importing data in the Cloudoffix system (migration). Following these steps will ensure data integrity and a seamless migration process.
1. Introduction and Preparation
Data transfer is not just a file upload process but an opportunity to improve the quality of your data. Clean, accurate, and standardized data directly impacts system performance and reporting accuracy.
Key Concepts
CSV (Comma Separated Values): A text-based file format where values are usually separated by commas or semicolons. It is the fastest and most reliable format for import operations.
XLSX (Excel): Standard Excel file. Easy to use but may not be as performant as CSV for very large datasets.
External ID: A unique identifier from an external system or one you define that uniquely identifies records. It is vital for updates and recurring imports.
Database ID: The unique numeric ID automatically assigned by the system to each record (e.g., 42).
2. Data Preparation (Pre-Import)
Organizing your data in Excel or a similar tool before uploading prevents 90% of errors.
Key points to Consider
Column Headers: Use clear headers in the first row of your file that correspond to the field names in the system (e.g., “Name”, “Email”, “Phone”).
Duplicate Records: Clean up duplicate records with the same email address or phone number.
Data Formats:
Date: Convert dates to the system’s default format (usually YYYY-MM-DD, e.g., 2023-12-31).
Numbers: Use the decimal separator (period or comma) that matches your system settings. Remove currency symbols ($, €) from the cell.
Phone: Aim to store phone numbers in international format (+905551234567) or just digits.
Trimming Whitespace: Clean unnecessary spaces at the beginning and end of cells (using the TRIM formula in Excel).
3. Master-Detail Import Strategy (The Golden Rule)
The most common mistake in data migration is trying to upload everything in a single file without considering dependencies. Use the Parent First, Child Second strategy for complex data.
The Logic: Why “IDs” matter?
If you try to import a Contact and type “Apple” in the “Company” column (Simple Name Mapping):
The system looks for a company named “Apple”.
Crucial: If it doesn’t exist, the import will typically FAIL with an error like “No matching record found”. Ideally, the specific record should exist beforehand.
Advanced: If you use “Show fields of relation fields” and map “Apple” to Company / Name, the system can create it, but this increases complexity and risk of duplicates (e.g., “Apple Inc” vs “Apple”).
The Solution: Use unique IDs (External ID or Database ID) to tell the system exactly which record to link to.
Step-by-Step Workflow for Relational Fields (M2O, M2M, O2M)
To successfully import data with relationships, follow this 3-step cycle:
Step 1: Import the “Parent” (Dependency) Data First Before importing your main file (e.g., Products), ask: “Does this record refer to something that doesn’t exist yet?” * Example: A Product belongs to a Product Category.
Action: Create and import the “Product Categories” file first.
Step 2: Export the “Parent” Data to get IDs Once categories are in the system, you need their unique IDs to use in your Product file.
Go to the Product Categories list.
Select all categories you just imported.
Export them.
Select only columns: Name and External ID (or Database ID if you are working on the same database).
Now you have a “Guidemap” (e.g., ‘Electronics’ > __export__.category_elec or ID 5).
Step 3: Prepare and Import the “Child” (Main) Data Now open your main Products Excel file.
Locate the “Category” column.
Instead of typing “Electronics”, paste the External ID (e.g., __export__.category_elec) or Database ID (e.g., 5).
Import the Products file.
Result: The system perfectly links the product to the existing category. No duplicates, no errors.
4. Importing Data into the System
Step-by-Step Import Process
In the list view of the relevant module, click on standard “Import” button (often found next to “Create”)
Load File: Click the “Load File” button and select the file you prepared.
Test Import: Click the “Test Import” button at the top left. This process does not load the data, it only checks for errors.
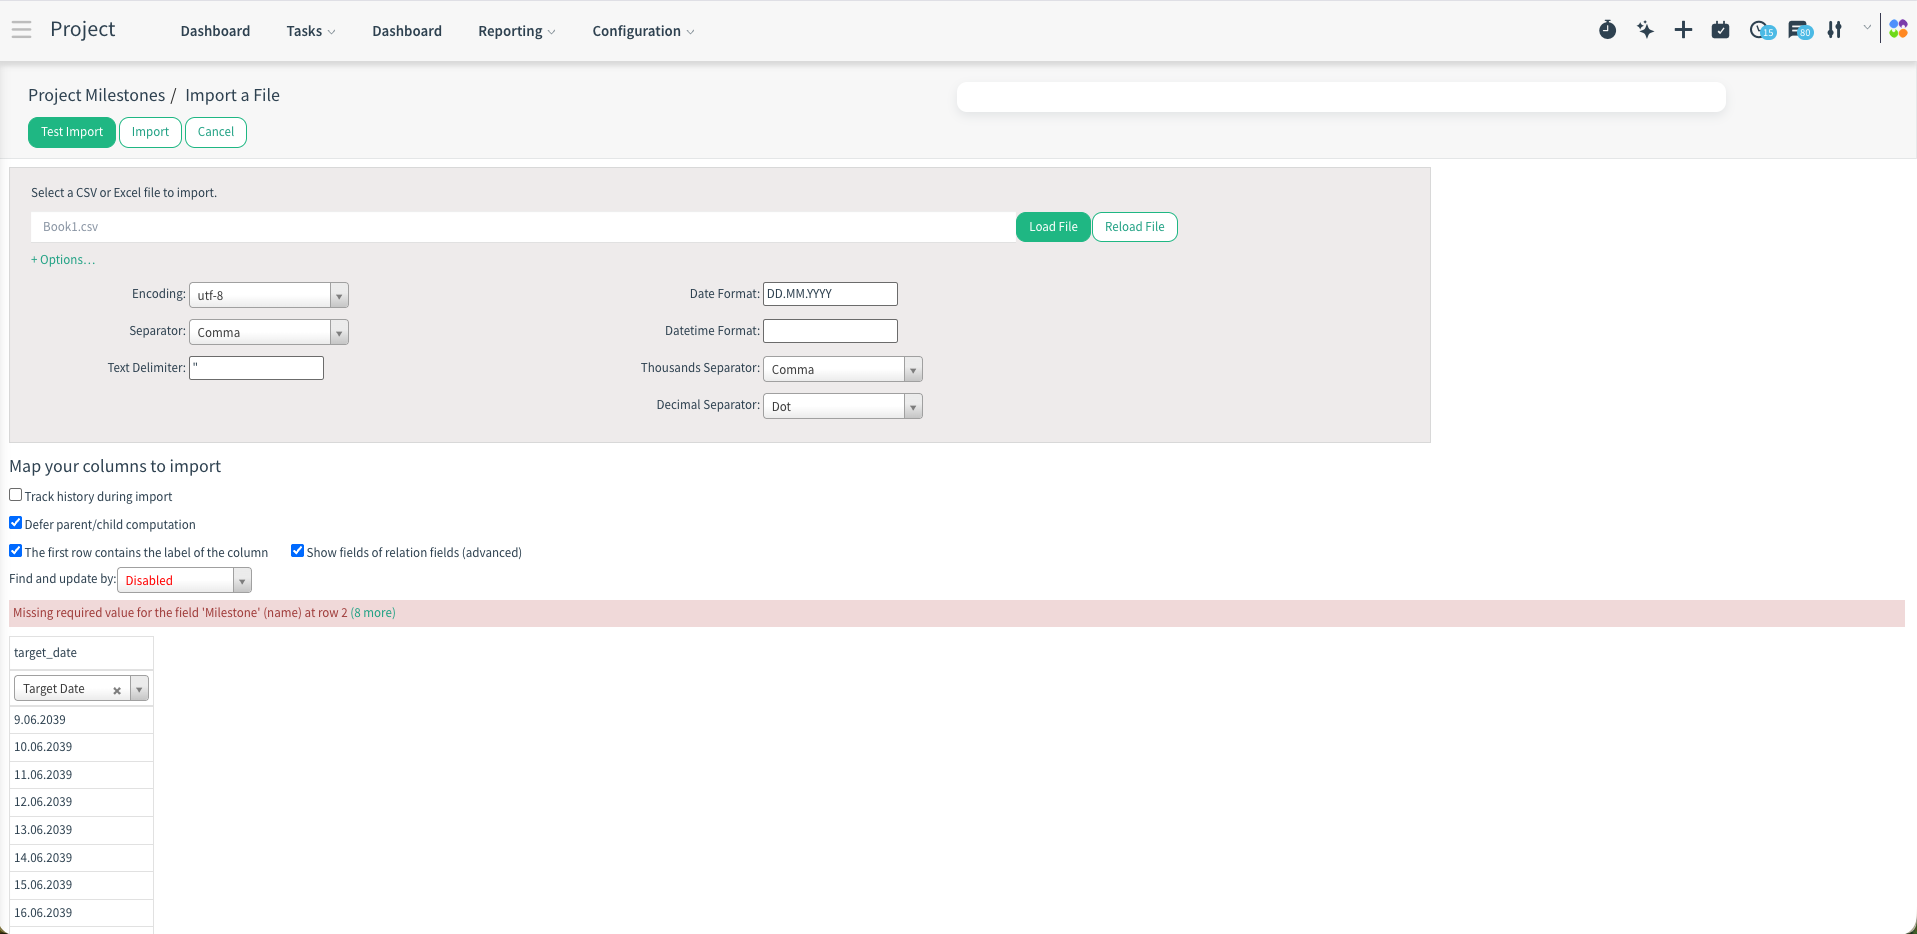
Import Options & Settings (Detailed)
After loading your file, you can click the “Options” button (or it may be visible by default) to configure how the system reads your file.
1. Formatting Options
These settings tell the system how to interpret specific data formats in your file.
Date Format: The format of dates in your file (e.g., YYYY-MM-DD or DD/MM/YYYY).
Date Time Format: The format for full date and time (e.g., YYYY-MM-DD HH:mm:ss).
Thousands Separator: The character used to separate thousands (e.g., , in 1,000.00).
Decimal Separator: The character used to separate decimals (e.g., . in 10.50 or , in 10,50).
★ Tip: If your numbers are not importing correctly (e.g., 1000 becoming 1), check these separators.
2. File Format Options (CSV)
Visible mostly for CSV files.
Encoding: The character encoding of your file.
UTF-8: The standard and recommended encoding.
ISO-8859-1 (Latin1): Common in some older European Excel versions. If you see weird characters (like ü instead of ü), try changing this.
Separator: The character separating columns (Comma ,, Semicolon ;, Tab, etc.).
Text Delimiter: The character used to wrap text fields (usually ").
System Logic: If your content contains the specific character used as a separator (e.g., a comma), that content must be enclosed in text delimiter for example double quotes.
Example: Imagine your columns are Name, Company. Use a comma as a separator.
Wrong: John, Smith, Inc. > System sees 3 columns: [John] [Smith] [Inc.] (Error).
Right: John, "Smith, Inc." > System sees the quotes and understands: [John] [Smith, Inc.] (Correct).
Note: Excel handles this automatically when saving as CSV. You usually don't need to add quotes manually unless you are editing the raw text file.
3. Advanced Import Settings
The first row contains the label of the column:
Checked (Default): The system ignores the first row and uses it to automatically match column names.
Unchecked: The system tries to import the first row as data.
Show fields of relation fields (advanced):
Basic Mode: You map a header “Company” to the field Company. The system expects an ID or Name to link to an existing company.
Advanced Mode: Allows you to drill down into the related object. You can map “Company Name” to Company / Name and “Company Phone” to Company / Phone.
Use Case: This allows you to create or update the related record (the Company) on the fly while importing the main record (the Contact).
Track history during import:
Warning: Significantly slows down the import.
Function: If checked, the system records every change in the “Chatter” (log) of the record. Usually disabled for bulk imports to save time.
Defer parent/child computation:
Checked (Recommended): Hierarchy structures (like the “Parent/Child” tree in accounts or categories) can be expensive to calculate. Checking this tells the system to recalculate the tree structure once at the very end of the import, rather than re-calculating it after every single row.
Example: When importing Product Categories, defining "Electronics > Computers > Laptops" requires calculating paths. Doing this 1000 times is slow; doing it once at the end is fast.
Import only into empty fields:
Accessible via the “Find and update by” section or specific options depending on version.
If checked, the system will NOT overwrite existing data. It will only fill fields that are currently empty (null) in the database.
Find and update by:
Allows you to specify which field to use to identify existing records.
Default: External ID. The system looks for the id column in your file.
Custom: You can choose fields like “Name” or “Email”.
Example: if you select “Email”, the system will search for a record with john@example.com. If found, it updates it. If not found, it creates a new one.
Warning: if multiple people have the same email, this can cause errors or update the wrong record.
File and Column Mapping
The system tries to match your file’s column headers with database fields.
Automatically Matched: Fields correctly guessed.
Not Matched: You need to manually select the correct field from the list.
Don’t Import (X): Use the cross (X) sign for columns in the file that you do not want to import.
Relational Fields (Many2One, Many2Many) - Detailed Explanation
When uploading a “Contact”, you need to specify the “Company” or “Country” they belong to using the mapping methods below.
Mapping Methods
1. Mapping by Name (Simple)
Selection: Select Company in the column header.
Behavior: The system searches for the name “Tech Corp.” in the database.
Found: Links the contact to that company.
Not Found: Standard behavior is to give an Error. (Unless you use “Structure extraction” mapping like Company / Name).
Risk: “Tech Corp” and “Tech Corp.” might be treated as different, leading to errors or mismatches.
2. Mapping by External ID / Database ID (Recommended & Safe)
Selection: Select Company / External ID or Company / Database ID.
Behavior: The system looks for the unique code (e.g., base.main_partner_1 or 42). It finds the correct record even if the name has changed.
1. Many2One (e.g., Contact > Company)
Definition: One record belongs to one other record.
Strategy: Import the Company first. Get its ID. Use that ID in the Contact’s parent_id column.
2. Many2Many (e.g., Lead > Tags)
Definition: One record can have multiple tags.
Strategy:
Import Tags first.
Export Tags to get their IDs (e.g., tag_vip, tag_retail).
In your Contact file, enter multiple IDs separated by a comma.
Example: tag_vip, tag_retail (Using IDs ensures exact matching).

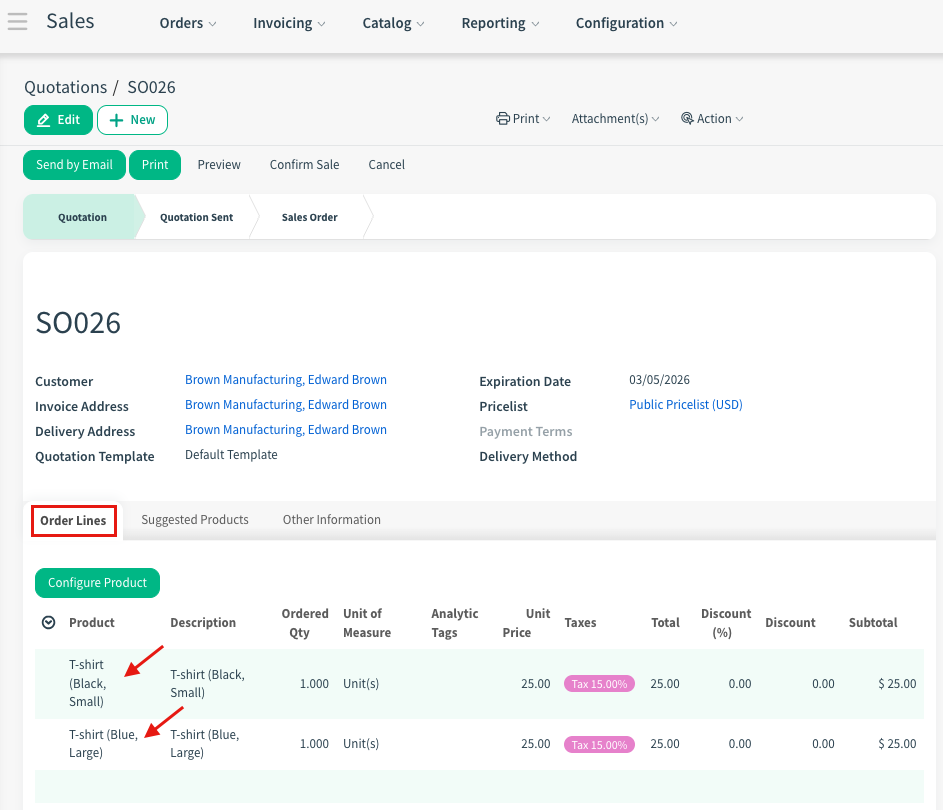
3. One2Many (e.g., Sales Order > Order Lines)
Definition: One object (Order) has a list of many items (Order Lines, Products).
Strategy:
Import the Header (Order) First.
Export Orders to get their External ID.
Import the Lines Second: Create a separate lines file. Add a column order_id (Order Reference) and fill it with the Order’s ID.
One2Many field (Product selection)
Large Files and Asynchronous Import
For very large files (e.g., exceeding 2000-5000 rows or with complex logic), the system may prompt you or offer an option to “Import in the background”.
This prevents the browser from timing out (“Server Disconnected”).
The import runs on the server, and you can usually track progress via the “Jobs” or “Queue” menu.
5. Exporting Data from the System
Exporting existing data is the safest method to update data or create a template.
List View: Go to the list view in the relevant module (e.g., Contacts).
Select Records: Select the records you want to export. Check the box at the top left to select all.
Action Menu: Click on “Export” from the “Action” menu (cog wheel or ‘Action’ button).
Export Window:
I want to update data (import-compatible export): You MUST check this option. This ensures the system generates an “External ID” for each record. Thus, when you edit and re-import this file, the system updates existing records instead of creating new ones.
Format: You can choose Excel (xlsx) or CSV.
Field Selection: Select and add the fields you need from the list.
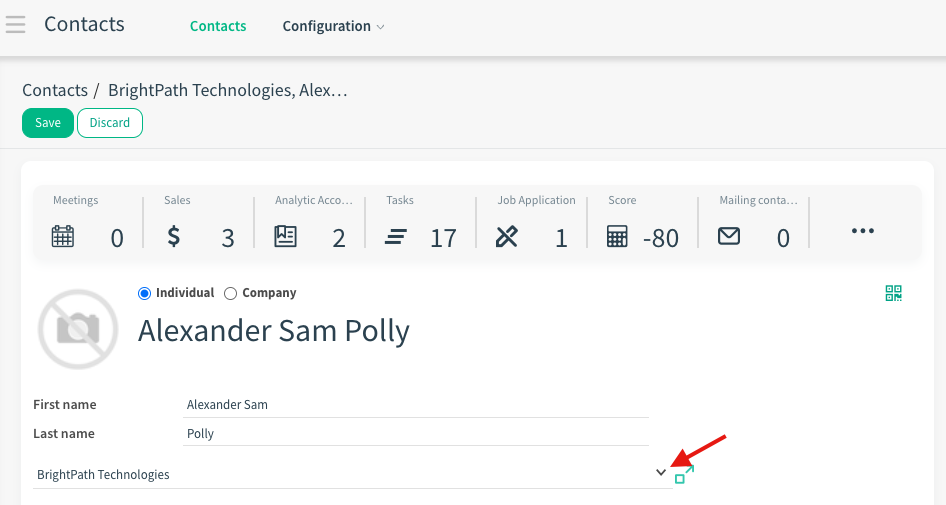
6. How to Find Database ID and External ID?
Accessing these IDs is critical for accurate data updates. Here is the step-by-step guide to finding them.
6.1. Finding the Database ID
The Database ID is the unique integer assigned to a record (e.g., 235). It is the simplest way to identify a record within the same database.
Method 1: From the Browser URL (Fastest)
Open the specific record you want (e.g., open a Contact record).
Look at the address bar at the top of your web browser.
Search for the parameter id=.
The number immediately following id= is the Database ID. * Example: .../web#id=235&view_type=form&model=res.partner > The ID is 235.
Method 2: Using Developer Tools
View Metadata:
Go back to your record.
Click the Developer Tools Icon that appears in the top navigation bar.
Select “View Metadata” from the dropdown menu.
A popup will appear showing the ID.
6.2. Finding the External ID (XML ID)
The External ID is a text-based unique identifier (e.g., base.main_partner_1) used for data migration across databases or for stable updates.
Method 1: The “Export” Trick (Best for Bulk) If you need IDs for many records at once:
Go to the list view (e.g., Contacts).
Select the records you want to identify (click the checkboxes)
Click Action > Export.
In the export window, search for the field “External ID” in the left panel.
Add it to the right panel.
Click Export. The downloaded Excel/CSV file will have a column with all the External IDs.
★ Tip: If a record doesn’t have one, the system will automatically generate one for you during this export (e.g., __export__.res_partner_123).
Method 2: Using Developer Mode (Single Record)
Open the record.
Click the Developer Tools Icon > “View Metadata”.
Look for the “XML ID” row in the popup.
Note: If this is empty or says False, the record was created manually in the interface. To give it an ID, simply use Method 1 (Export).
Example: Project Milestones Import
7. Common Errors and Solutions
| Error Message / Situation | Possible Cause | Solution |
|---|---|---|
| “No matching record found for…” | No match found for a relational field | Check for typos or create that missing record in the system first. |
| “Multiple matches found for…” | Multiple records have the same name (e.g., Two “John Doe”s). | Match using the unique “ID” or “Email” field instead of the name. |
| Date Format Error | File date format mismatch. | Check Excel formatting or use YYYY-MM-DD. |
| Encoding Error (Unicode) | (CSV) Encoding is not UTF-8. | Open in Notepad++/Text Editor and save as “UTF-8”. |
8. Summary Checklist
Are duplicate records cleaned?
Are mandatory fields (name, etc.) filled?
Are date formats corrected?
If updating, does the “External ID” column exist?
Was “Test Import” run and errors resolved?
By following these steps, you can perform your data transfers securely and smoothly.