How to Create Surveys
Create Surveys to suit any occasion!
Begin at the App Drawer screen. Click ‘Surveys’ App, which is located in the Marketing Cloud Drawer.
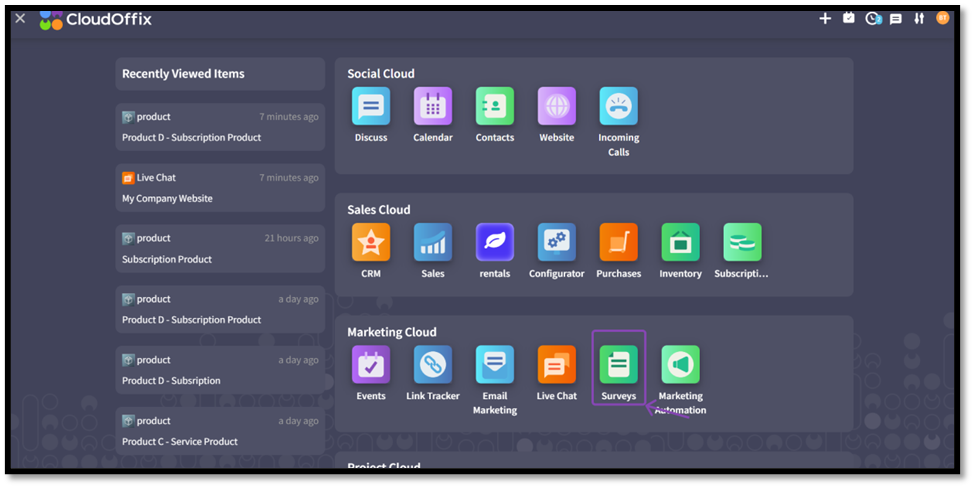
Fig. 1: CloudOffix App Drawer page, Click the Surveys App to begin.
In the surveys dashboard, all current surveys are shown in their states. The views icons at the top right corner of the screen allow for either Kanban or List view to be selected.
Click the ‘New’ button at the top left corner of the screen to create a new survey.
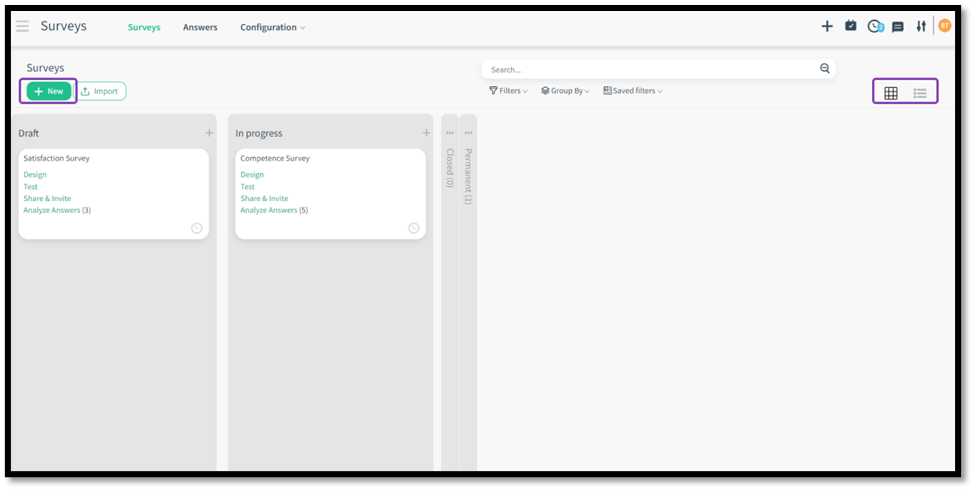
Fig. 2: Click the ‘New’ button
In the New Survey screen, write a title for the survey. This is a mandatory field, and the system will not allow progress if it is left blank.
In the ‘Edit Pages and Questions’ tab, click ‘Add an item’ to create survey pages and adding questions.
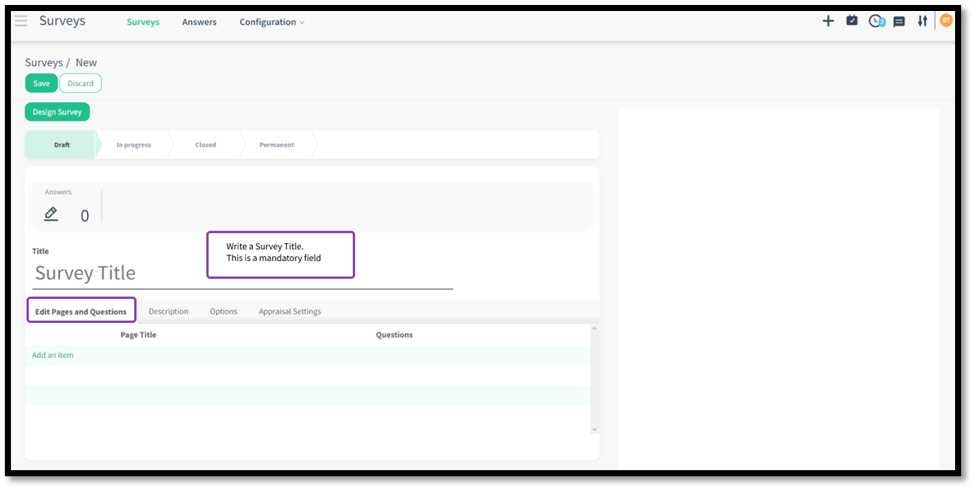
Fig. 3: Survey title is a mandatory field.
The ‘Create pages’ pop up screen has two tabs. In the ‘questions’ tab, Write a title for the page. This is a mandatory field. Click ‘Add an item’ to begin creating survey questions.
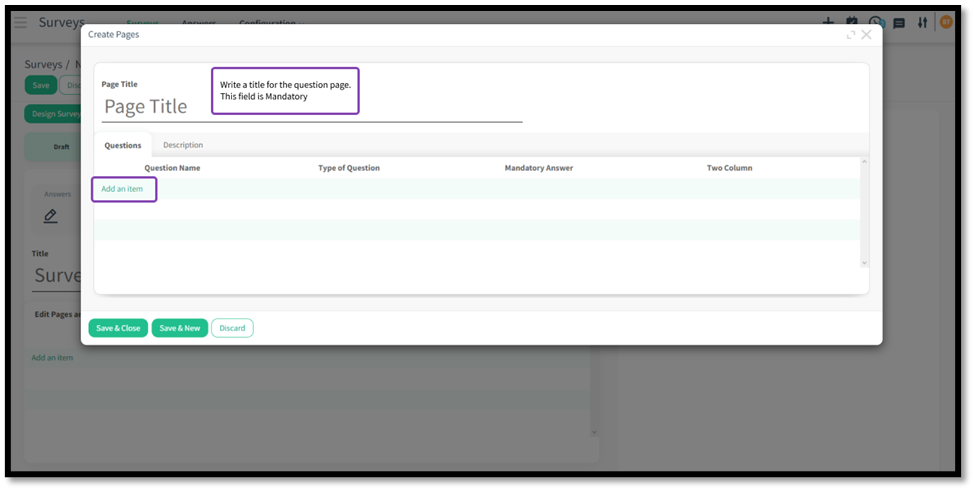
Fig. 4: Create as many question pages as necessary.
Next, click ‘Add an item’, and select the question type. The questions have the following functionalities. Select the most appropriate type for the question:
Multiple lines Text Box: Use this question type if the answer is expected to be an explanation or freestyle writing is required.
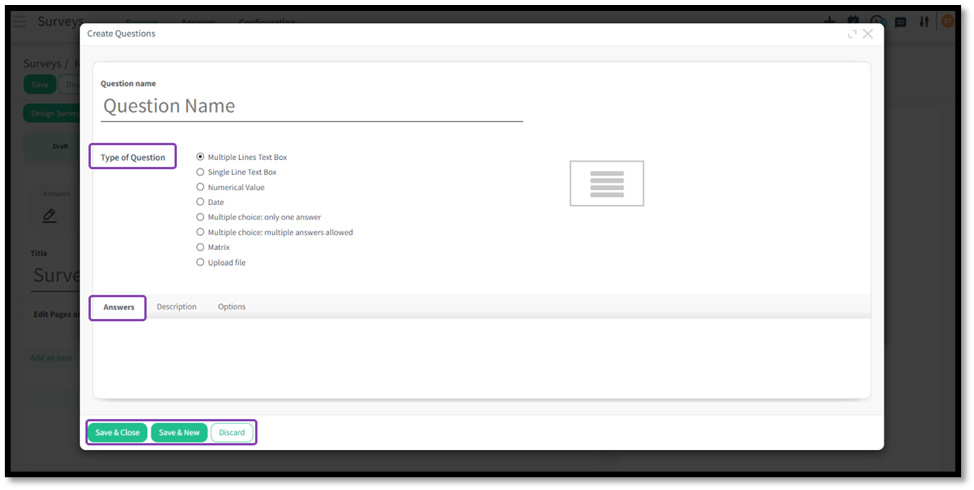
Fig. 5: Create questions using various question types.
The ‘Options’ tab comes equipped with additional options and constraints for the question.
Mandatory answer means the participant cannot move on without answering the question, and ‘Error Message’ of your choice will pop up is the question has not been answered.
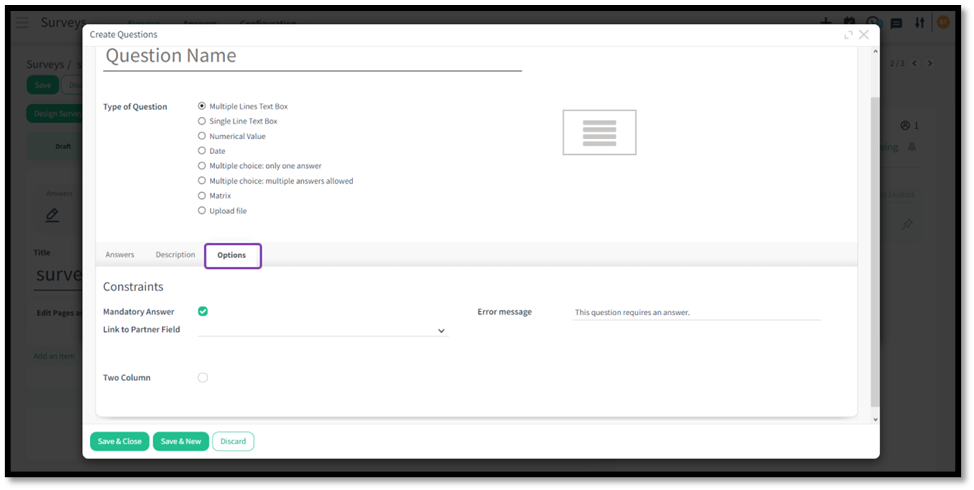
Fig. 6: Multiple Lines Text box question type.
Single line text Box: this question type can be used if the answer fits into one line, or, if an email address has been requested, click the ‘Input must be email’ checkbox located in the ‘Answers’ tab. This will also mean the system will confirm and accept only if the answer is an email.
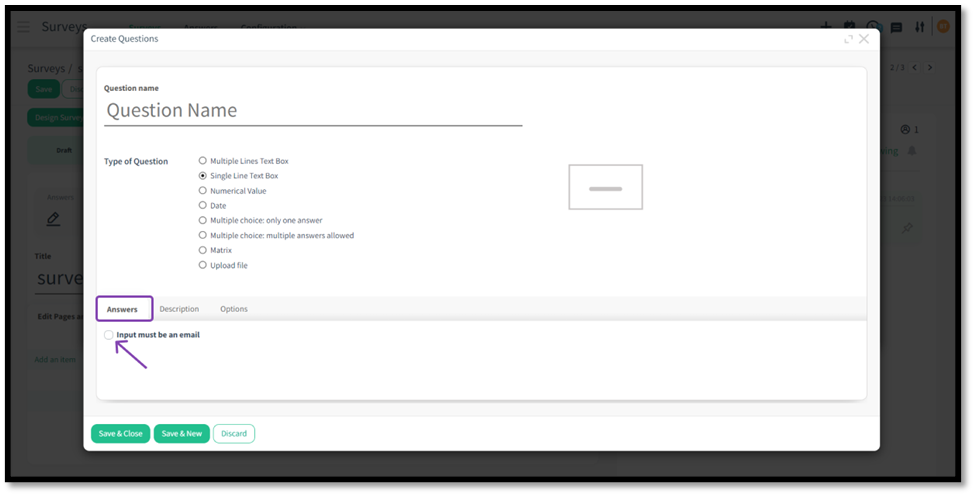
Fig. 7: Activate email validation as an answer.
The ‘Options’ tab offers constraints to the way the question should be answered, such as mandatory, or linking it to another question field.
Link to Partner Field means the question can be linked to the corresponding field in the system, making the question and answer uniquely identifiable. For example: selecting the ‘Single line text’ as the question type, and the question asks for the participants’ email address. In this case, we can link the given answer to the existing partner field in the system, which will automatically link the two details, then validate and identify the participant.
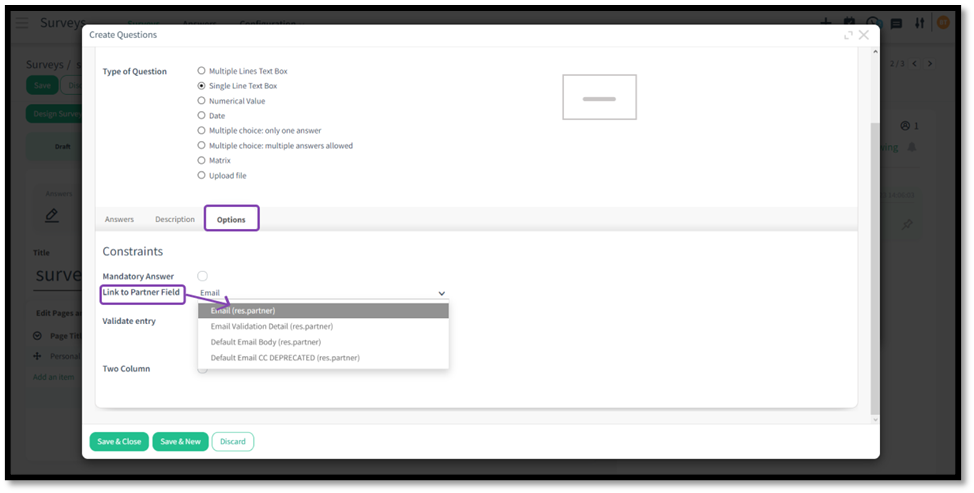
Fig. 8: Link to Partner Field is a very powerful feature that allows unique participant identification.
Numerical Value: the answer required is a numerical type, such as entering a telephone number.
Date: select this type for questions that require dates such as D.O.B., or a date range.
The ‘Options’ tab offers constraints to the way the question should be answered, such as mandatory, or linking it to another question field.
Validate the answer entry, set constraints for minimum and maximum dates, and write a validation error message to be displayed.
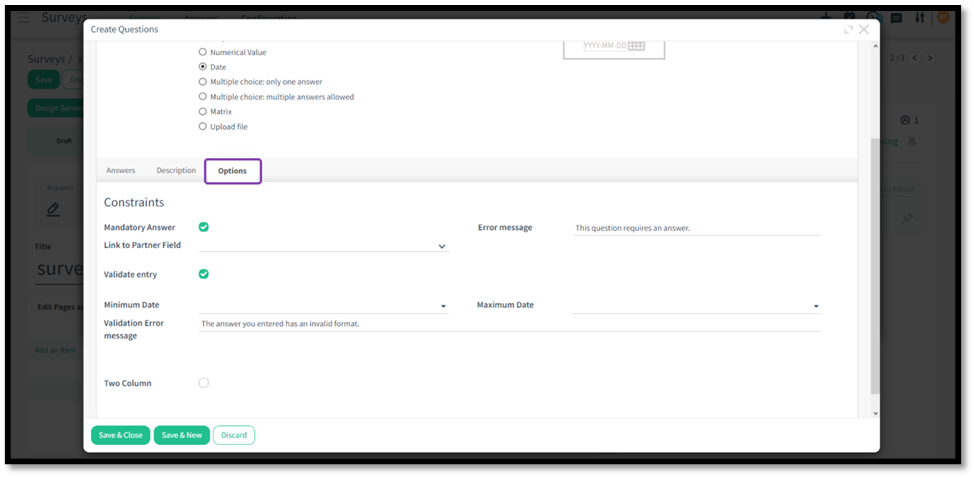
Fig. 9: Options tab.
Multiple choice: only one answer: If only one answer is required to be selected out of the given options. In the ‘Answers’ tab, click ‘Add an item’ to add the answer choices for the question.
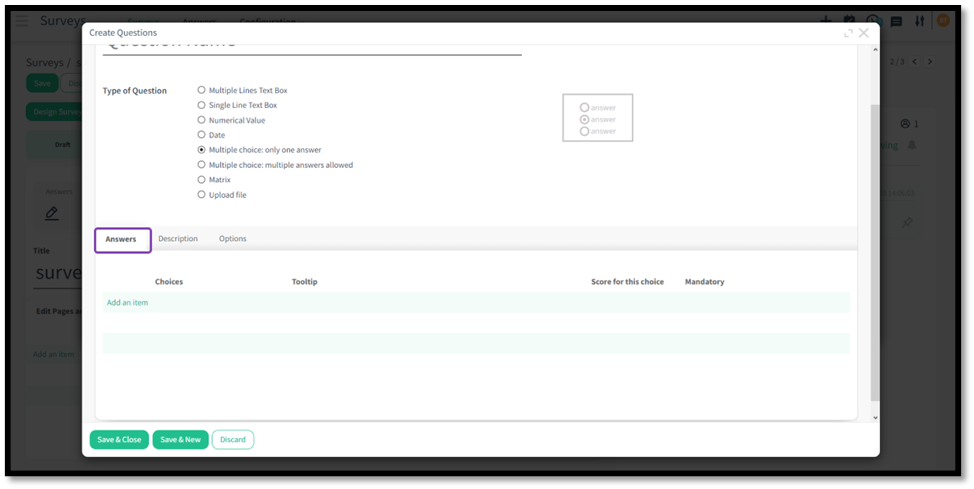
Fig. 10: Multiple choice only one answer question type.
The ‘Options’ tab offers constraints to the way the question should be answered, such as mandatory, or linking it to another question field.
This question type also has other headings such as ‘Display Mode’, which allows settings for the format and number of columns, and a question tooltip line.
‘Allow Comments’ section, as the name suggests has various comments options.
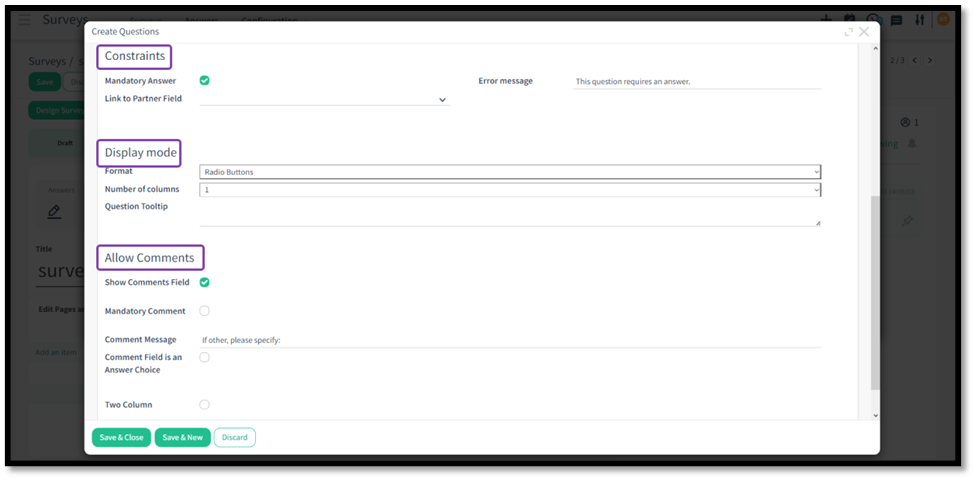
Fig. 11: Different options and constraints found in the options tab for each question type.
Multiple choice: multiple answers allowed: this multiple choice allows for more than one answer. It is good for letting participants select more than one choice such as types of allergies.
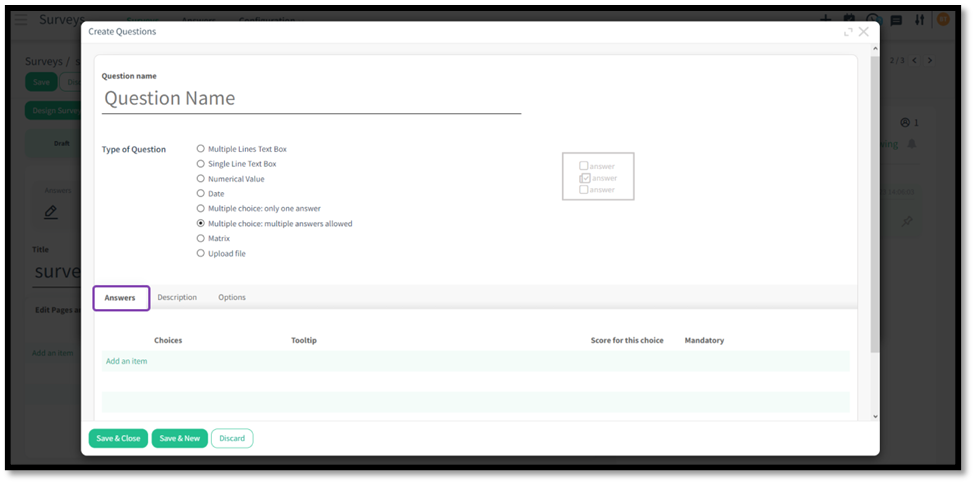
Fig. 12: Multiple choice multiple answers allowed question type.
Click ‘Add an item’ in the ‘Answers’ tab to enter the choices for the answer. And click ‘Save & Close, ‘Save & New’ or ‘Discard’.
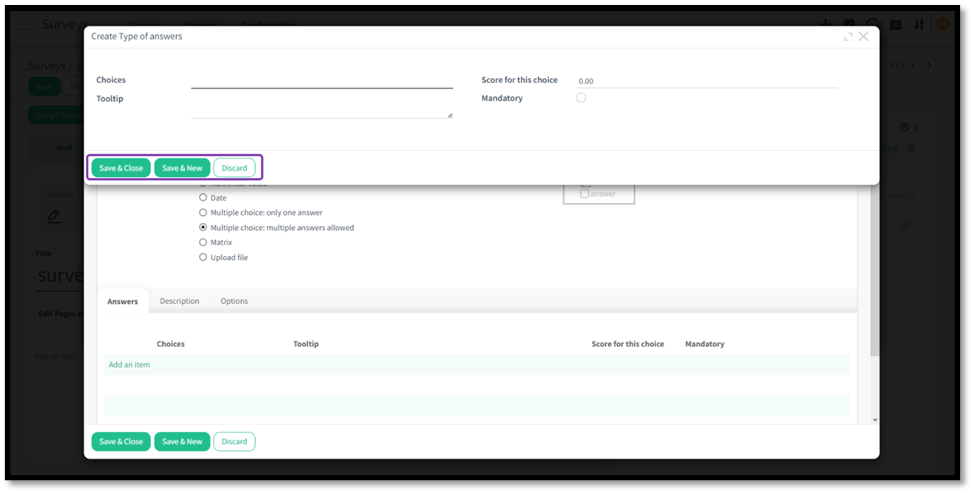
Fig. 13: Create answer choices for the multiple choice question type.
Matrix: has rows and columns where the participant selects the answers in rows corresponding to the columns. A good example of this question type is satisfaction questions.
In the ‘Answers’ tab, click ‘Add an item’ to add the answer choices for the question.
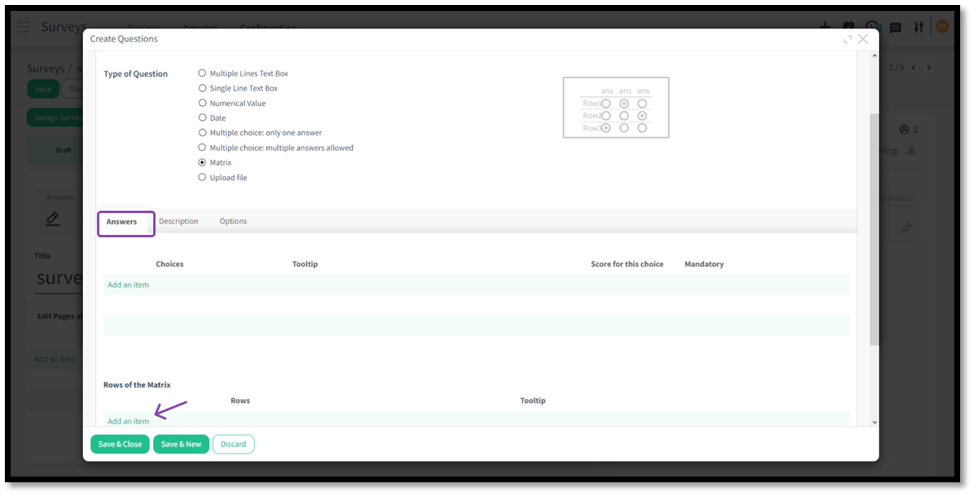
Fig. 14: Matrix question type.
The ‘Options’ tab offers constraints to the way the question should be answered, such as mandatory, or linking it to another question field.
This question type also has other headings such as ‘Matrix Type’, which asks for the number of choices required per row.
‘Allow Comments’ section, as the name suggests, has various comments options.
Click Save and Close
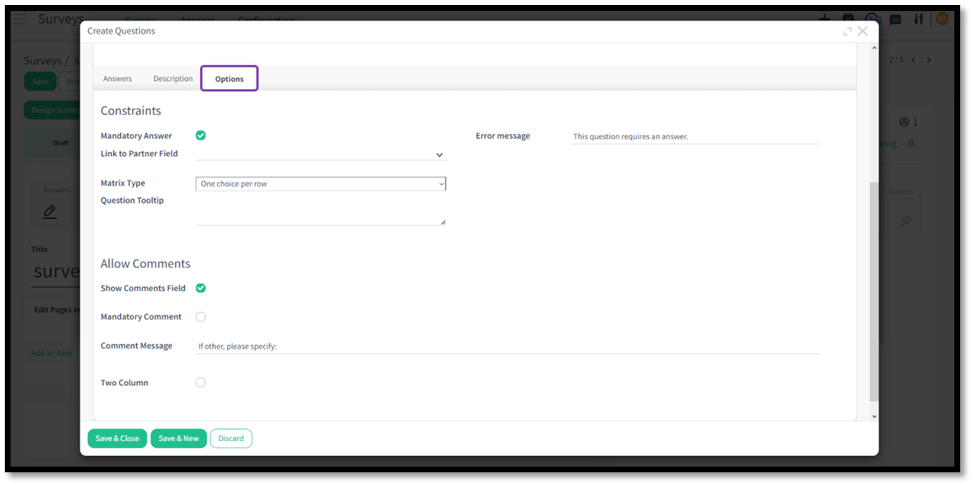
Fig. 15: Set constraints for the matrix question type.
Upload file:
Select this type if the participant is required to upload a file to the system. This could be used for CV’s, doctor’s certificates, or any other documentation.
Click Save and Close once completed.
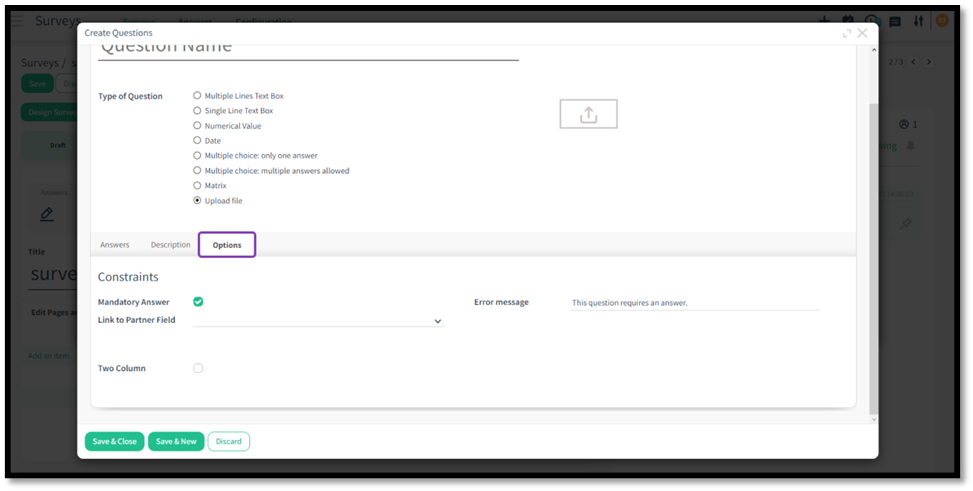
Fig. 16: Allow participants to upload a file.
Once the survey is complete with its pages and questions, which are visible in the ‘Edit Pages and Questions’ tab.
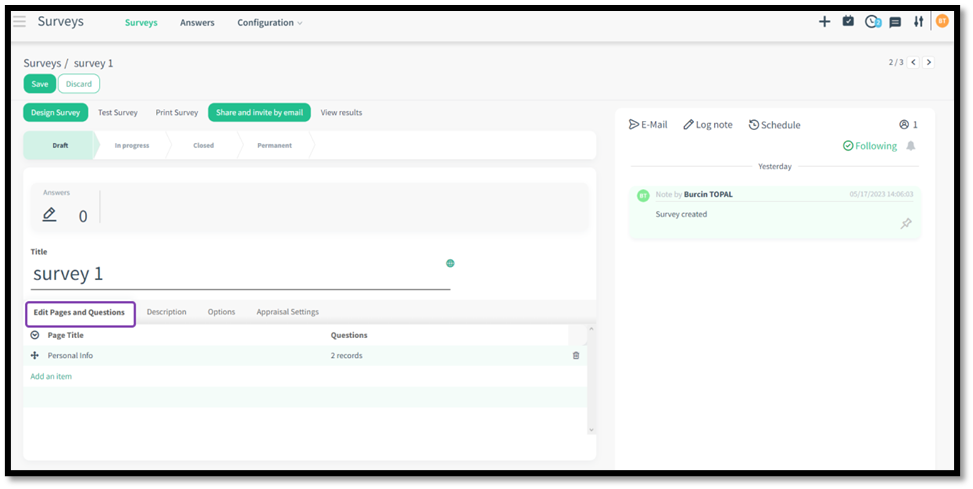
Fig. 17: View the created question pages in the Edit Pages and Questions tab.
The Descriptions tab is where a description about the Survey can be written for future reference.
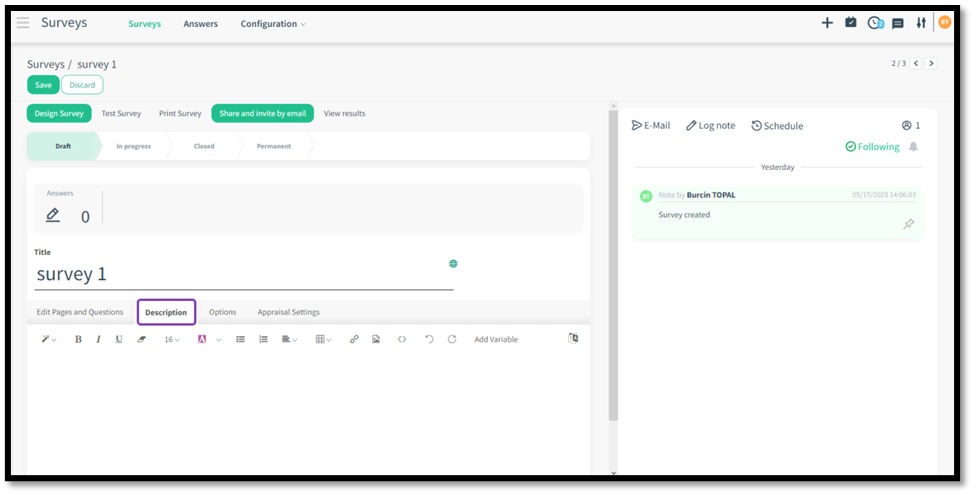
Fig. 18: Describe the purpose of the survey.
The ‘Options’ tab is fully equipped with many settings and constrictions for the total survey.
Some of these options are whether the participant needs to be logged in, and if there are attempt limits.
A special feature, which becomes visible only if the ‘Quiz Mode’ is selected: ‘Screenshots’ and ‘Photographs’, where the system asks for permission to take photographs and screenshots while the survey is being completed. If the participant rejects this request, then they will not be allowed to complete the survey. This is a great feature when participant identification is required, such as an exam.
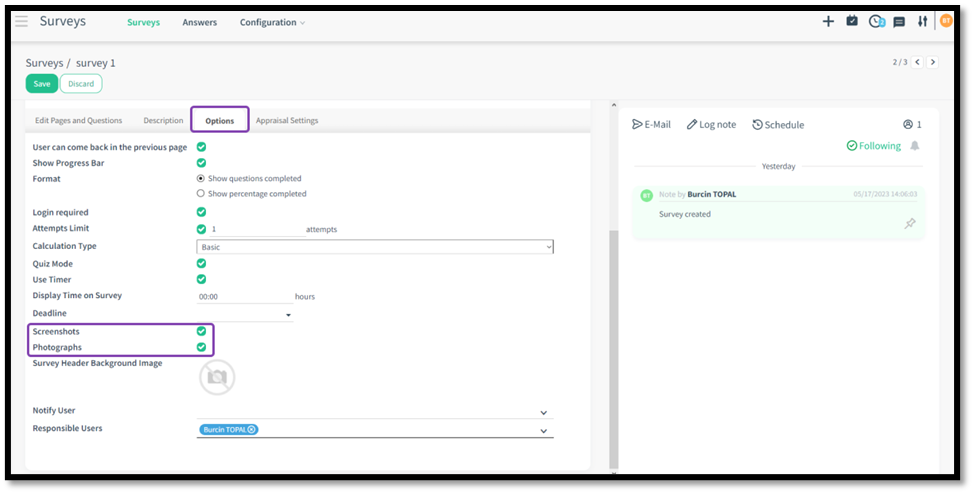
Fig. 19: Special feature if the quiz mode is selected.
The ‘Appraisal’ tab is used to select the expert level such as Manager, Specialist, etc. if this survey is to be designed for an appraisal. This tab is only visible if the 360 Degree Appraisal Module is installed in the HR cloud.
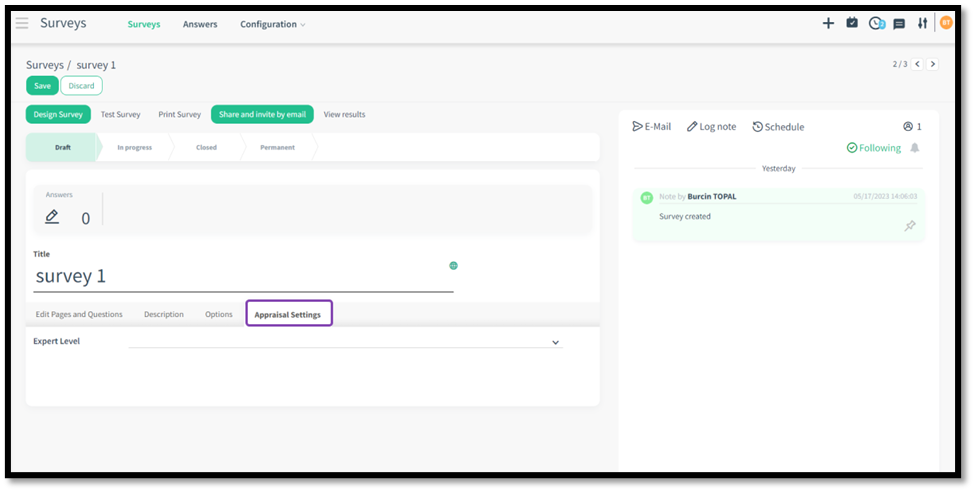
Fig. 20: Appraisal tab only visible if the HR Cloud and Appraisal Modules are installed.
Click the ‘Save’ button located on the top left of the screen.
Click the ‘Design Survey’ button to go to the frontend and design in website view.
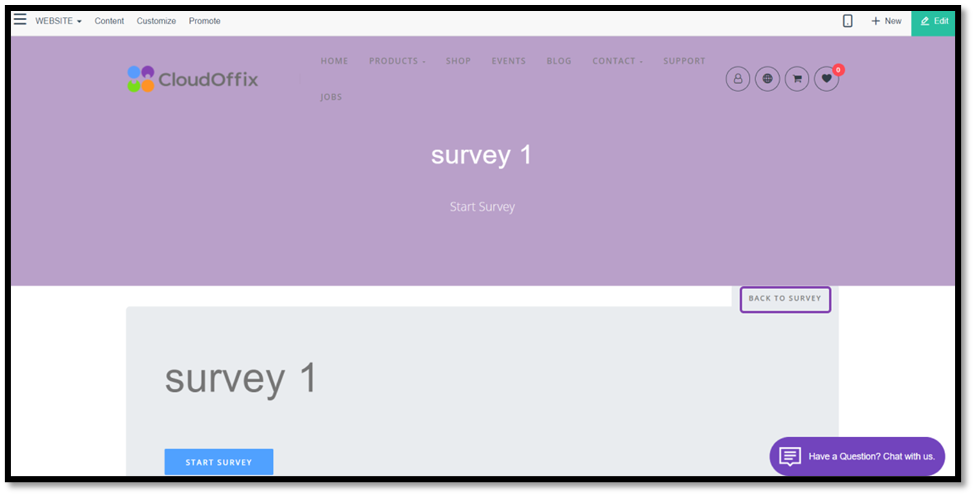
Fig. 21: The survey viewed in the Frontend.
To return to the survey in the backend, click on ‘Back to Survey’.
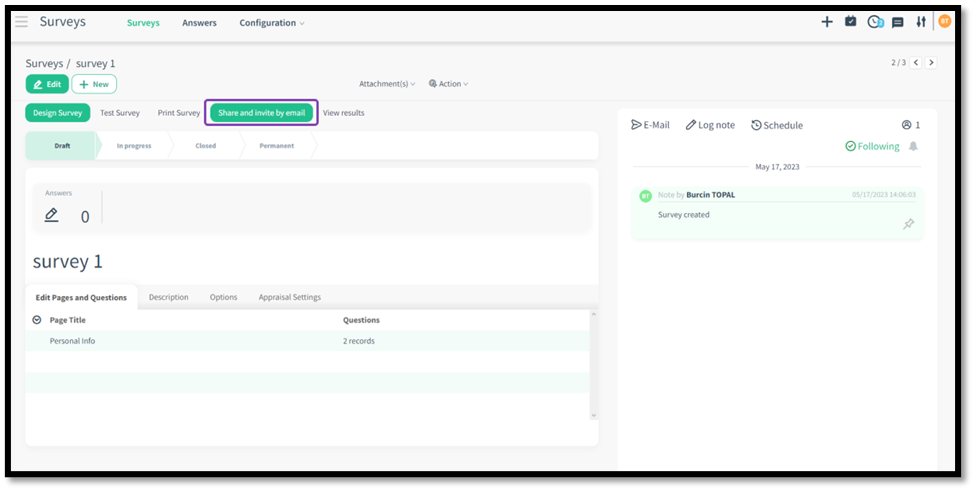
Fig. 22: Share the survey and invite participants by email.
By clicking ‘Share and invite by email’, a new pop up will offer various emailing options such as share the public web link to your audience. This option gives links to the survey which can then be copied and sent.
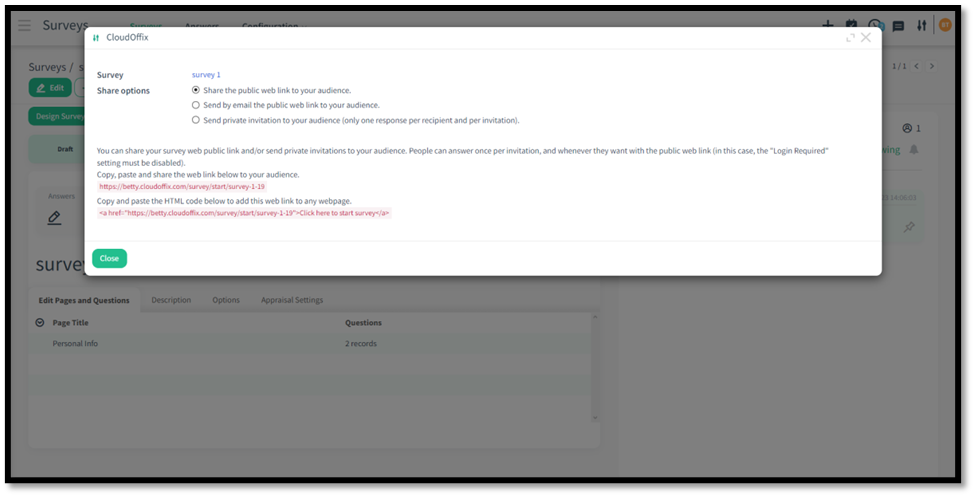
Fig. 23: Share the public web link simply by copying and pasting.
The options to send by email reveal the email page, where the details can then be entered and sent directly to participants.
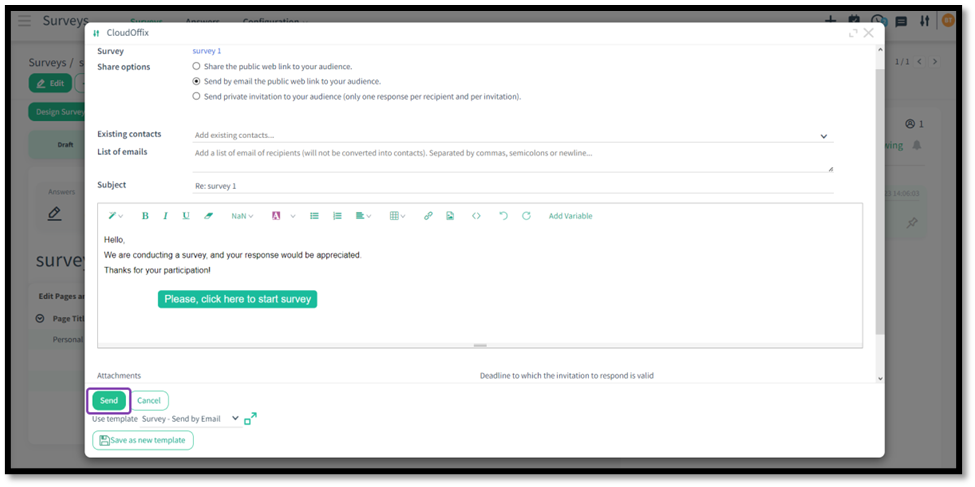
Fig. 24: Send by email either publicly or privately by invite only.
Congratulations! You have just created a survey.
